You are using an out of date browser. It may not display this or other websites correctly.
You should upgrade or use an alternative browser.
You should upgrade or use an alternative browser.
N/A Mazda 626 RWD conversion from Brazil.
- Thread starter mbretschneider
- Start date
-
- Tags
- 626 conversion drift mazda rwd
mbretschneider
Member
UPDATE JUNE 1st and 2nd weeks
Since last time, i fixed the sterring rack position (no pics, sorry, but it is a simple fix, just moved the steering point in the wheel hubs up the same i moved the rack itself).
So, since the car runs properly, i started to fix the small details, and prepare it to be finished. As much as i like a light car, holes in the middle of the floor aren't exactly safe or comfortable, so i started to add metal, metal fabricated by me for the first time (feels gooooood man *drools*)
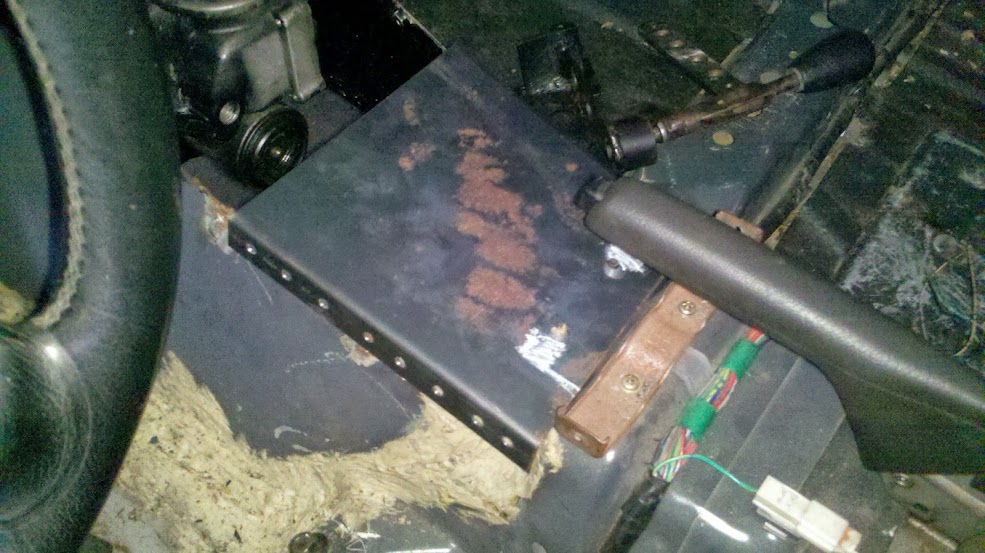
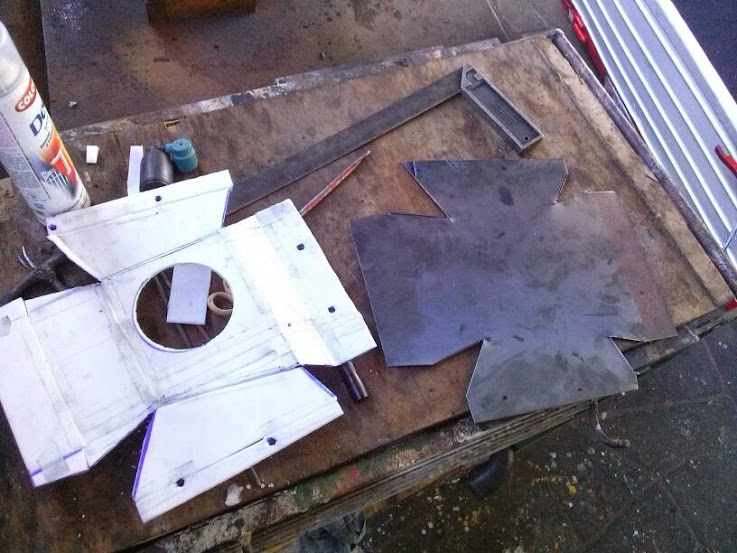
Then , after filling this gap and removing (you can see it on the background) the provisory lever, i started to use CAD (carboard aided design) to build a access hatch for the new levering system

Fortunatelly im well familliar with CAD Design, and was able to create a base template, and then some fancy drawing

We then "open" the design over the metal, you're all more knowleadgeable about that than myself, i believe
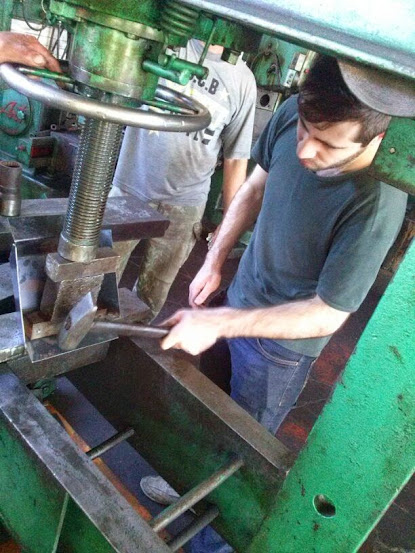
Then we massage it a bit here and there, hammer time!
After that, we make some holes and fit it to the car, to see how it fares

After fixing the proportions and position of everything, time for fabrication. I dont know how to solder yet, so my friend mr. Valdir completed the work on the lathe and soldering machine. After it i will engineer the new lever in a more appropriate fashion ,since part of it will be exposed inside the vehichle.
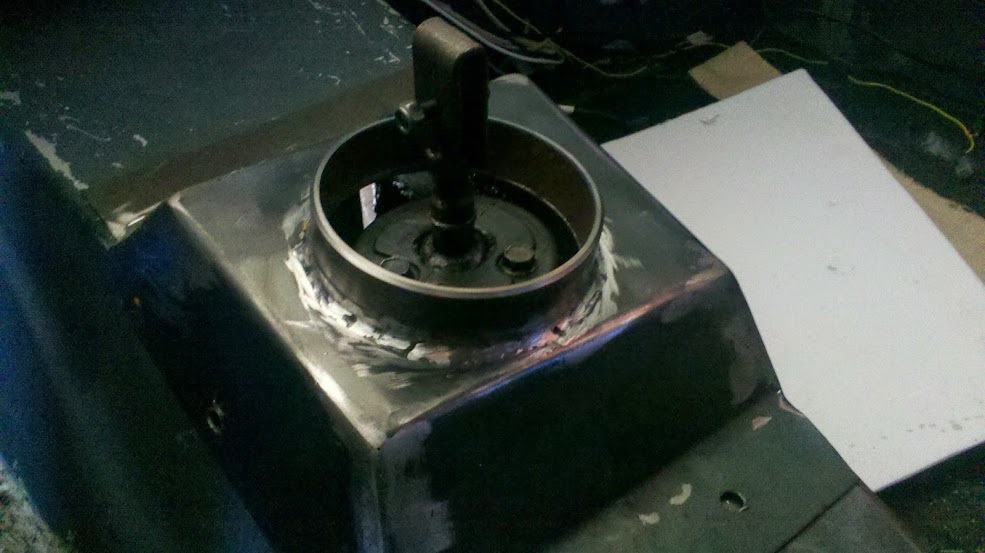
Expect some anodized metal, and some powder coated metal bits too =D
Since last time, i fixed the sterring rack position (no pics, sorry, but it is a simple fix, just moved the steering point in the wheel hubs up the same i moved the rack itself).
So, since the car runs properly, i started to fix the small details, and prepare it to be finished. As much as i like a light car, holes in the middle of the floor aren't exactly safe or comfortable, so i started to add metal, metal fabricated by me for the first time (feels gooooood man *drools*)

Then , after filling this gap and removing (you can see it on the background) the provisory lever, i started to use CAD (carboard aided design) to build a access hatch for the new levering system

Fortunatelly im well familliar with CAD Design, and was able to create a base template, and then some fancy drawing

We then "open" the design over the metal, you're all more knowleadgeable about that than myself, i believe

Then we massage it a bit here and there, hammer time!

After that, we make some holes and fit it to the car, to see how it fares

After fixing the proportions and position of everything, time for fabrication. I dont know how to solder yet, so my friend mr. Valdir completed the work on the lathe and soldering machine. After it i will engineer the new lever in a more appropriate fashion ,since part of it will be exposed inside the vehichle.
Expect some anodized metal, and some powder coated metal bits too =D
mbretschneider
Member
Jul-Aug-Sep 2014 big update!
How's it everybody? I realized that it has been three months since my last post, and for a good reason: I was tasked to
install and tune a complete EMS on a subaru impreza, the job was completed a couple days ago (10-Oct-2014). Working on the GF's subaru and making some trips around got me doing little in the 626 (all for a good cause).
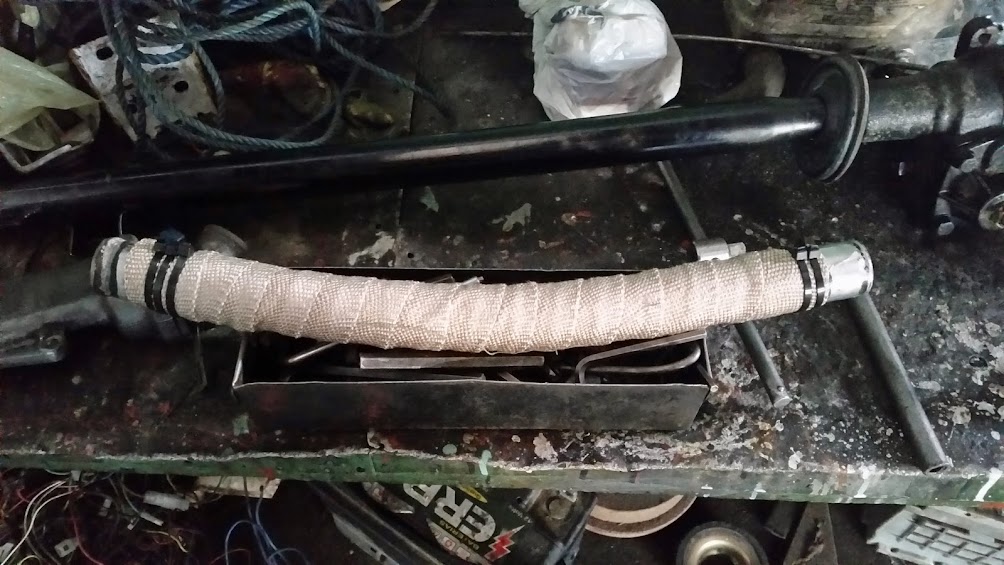
This is what has been hapenning, then. 1st of all i was dealing with bad cooling, got the car running and the engine temps were rising fast. After inspecting all of the cooling system for leaks or simmilar it ended up showing up as possible bad placement of the head return pipe (that bridges over the exhaust manifold), the solution was to wrap it with thermal tape...
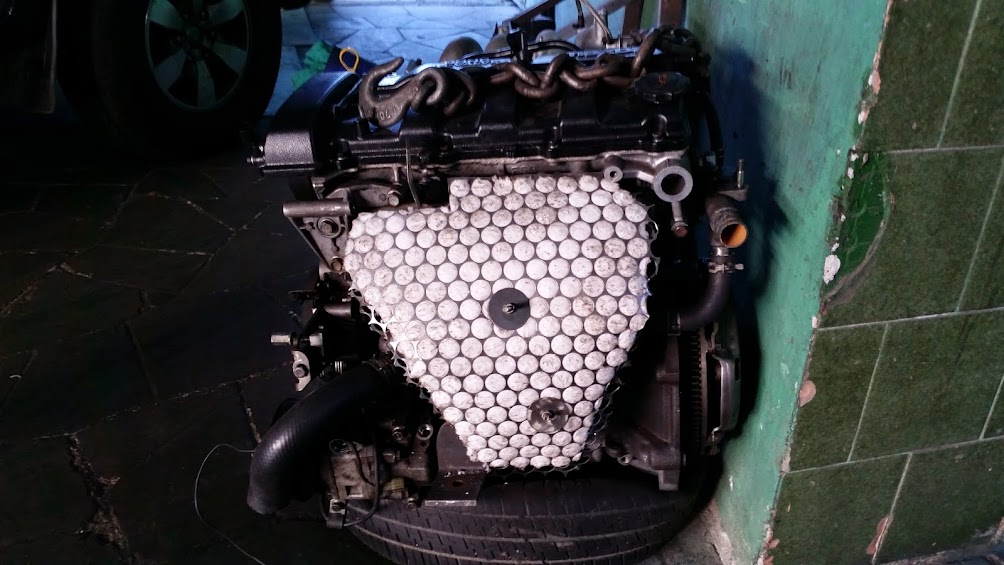
After that, to not remove the exhaust system, a blanket of ceramic (like the ones used inside ovens) covers the exhaust, with all those barriers the engine now runs at easily controllable temperature (wich for now is 90º celsius).
Issue solved, time to turn to the interior/finishings, since each step i take now is intended to be the last on each department in order to get the car running, i have to be sure everything that must seal/cover/tie/etc is done properly in order to save myself from rattles, leaks and this kind of stuff when the car is running correctly, mostly because the car is rare and you can't have new trim for it easily. Ruined trim would be expensive AND a big delay on the project.

Fuel tank hatch covers from old subarus would do the trick on covering the access to the fuel pumps and keeping the cabin sealed tight.I
I also took the time to fix better connections for the coil-over-plug setup:
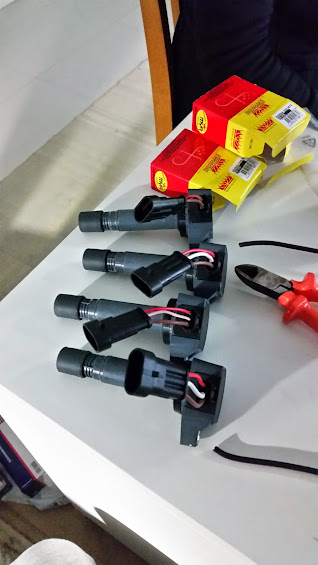
Using some domestic market connectors, hot glue, clamps and a little solder, i managed to fix (in a reversible way) connectors that are easy to find and replace if needed to my Civic Si coils (since the honda connectors aren't avaliable and it would take me a lot of time to source used parts that may fail from a junkyard).

Here is another shot, on detail, to show the connectors and glue.
Next, i removed the engine to solve clutch engaging issues, when re-fitting it the last time , i misplaced the clutch arm and had to solve it

Here's the mess, and then, the obvious steps...
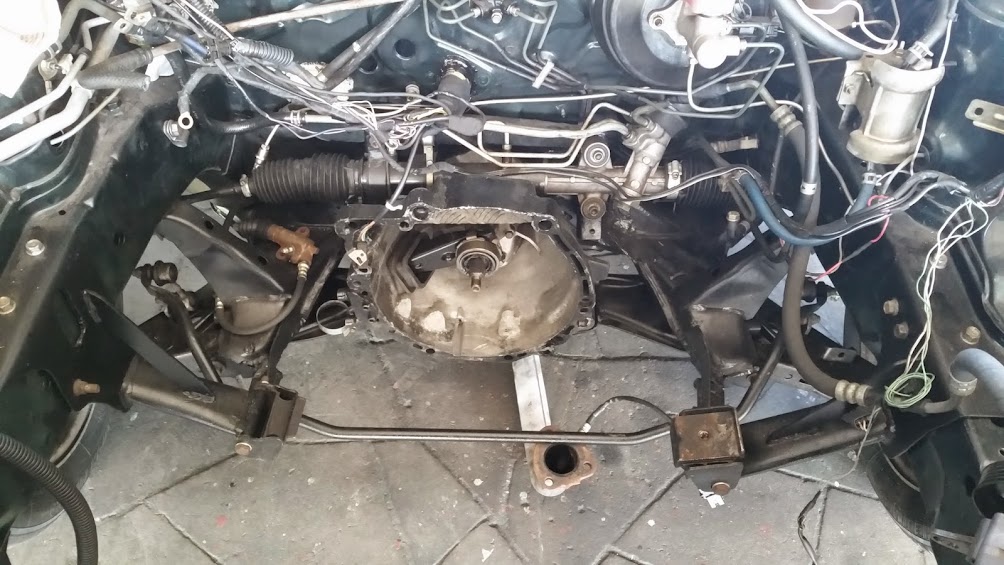
Re-positioning it properly gave me time to analyze the methods of engine install and removal in my unusual setup (i will have to create a way do re-allocate the steering rack in the future, but for now, it will be like this because i want to drift badly, and can live with the procedures)

engine is mounted again, and an adjustable pushrod for the clutch slave cylinder was created

Proper engagement is not only necessary in racing and such, but also for safe and comfortable street driving (it will be road legal, as stated before).
A set of adjustable rear arms was also crafted, in order to further tune toe and correct any bad angles that might be there , courtesy of the heavy mods the car went through

After that, i turned my attention to the handbrake system. The one i 1st designed wast working at all. It wasnt able to lock the wheels with the drums, and the lever was just a big mess. Since we took the care to keep most of the original systems intact , i re-stated the original handbrake cables, original brakes and will use the subaru brakes as a second set of calipers, actuated by a separated lever and reservoir.

This picture shows the subaru caliper sitting on top and the mazda caliper on the lower portion, the mazda caliper holds the parking-brake setup and the footwork, the other one handles only the drift brake.

And this is the picture of the final set-up. I still have to provide the proper brake lines for the drift brake, but its easier to source this so i am letting it go for now, will work on it later. I had brake issues to solve.

I have bled again and again the brake system, with a system that uses a reservoir, a fuel pump and a remote control to move the fluid through the lines. No bubbles ever, but a spongy brake pedal. The vacuum reservoir is working accordingly (i heard lot of stories about people going into bigger brakes and needing a different brake booster), it ended up being the brake master cylinder.
I preffer brand new master cylinders, but the only option i had was to have it serviced (importing it would be way too expensive), it will be on my hands on the monday (13-oct-2014). I will report in when i have it installed, but seeing how bad was its shape, i will probably have everything working i hope.
On a side note, performance oriented, i got myself the ITBs from a yamaha R1, and i will install them on the car as soon as i get its brakes working, along some custom made exhaust manifold, since the car feels held back by the current exhaust size. I hope the ITBs and proper exhaust tuning can take me closer to my power goals.
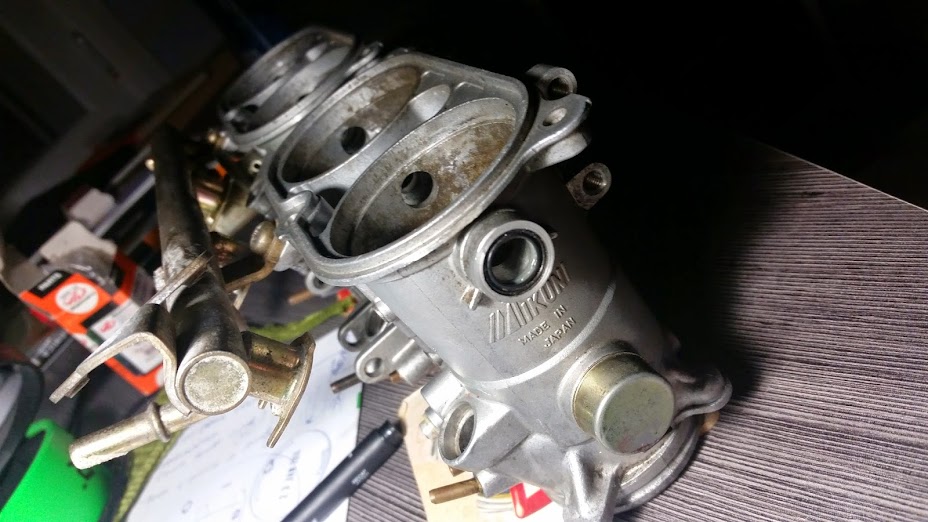
Thats all for now folks, i am deeply sorry to keep you all in the void like that, at the same time i am glad for ressurecting the thread.
How's it everybody? I realized that it has been three months since my last post, and for a good reason: I was tasked to
install and tune a complete EMS on a subaru impreza, the job was completed a couple days ago (10-Oct-2014). Working on the GF's subaru and making some trips around got me doing little in the 626 (all for a good cause).
This is what has been hapenning, then. 1st of all i was dealing with bad cooling, got the car running and the engine temps were rising fast. After inspecting all of the cooling system for leaks or simmilar it ended up showing up as possible bad placement of the head return pipe (that bridges over the exhaust manifold), the solution was to wrap it with thermal tape...

After that, to not remove the exhaust system, a blanket of ceramic (like the ones used inside ovens) covers the exhaust, with all those barriers the engine now runs at easily controllable temperature (wich for now is 90º celsius).

Issue solved, time to turn to the interior/finishings, since each step i take now is intended to be the last on each department in order to get the car running, i have to be sure everything that must seal/cover/tie/etc is done properly in order to save myself from rattles, leaks and this kind of stuff when the car is running correctly, mostly because the car is rare and you can't have new trim for it easily. Ruined trim would be expensive AND a big delay on the project.

Fuel tank hatch covers from old subarus would do the trick on covering the access to the fuel pumps and keeping the cabin sealed tight.I
I also took the time to fix better connections for the coil-over-plug setup:

Using some domestic market connectors, hot glue, clamps and a little solder, i managed to fix (in a reversible way) connectors that are easy to find and replace if needed to my Civic Si coils (since the honda connectors aren't avaliable and it would take me a lot of time to source used parts that may fail from a junkyard).

Here is another shot, on detail, to show the connectors and glue.
Next, i removed the engine to solve clutch engaging issues, when re-fitting it the last time , i misplaced the clutch arm and had to solve it

Here's the mess, and then, the obvious steps...

Re-positioning it properly gave me time to analyze the methods of engine install and removal in my unusual setup (i will have to create a way do re-allocate the steering rack in the future, but for now, it will be like this because i want to drift badly, and can live with the procedures)

engine is mounted again, and an adjustable pushrod for the clutch slave cylinder was created

Proper engagement is not only necessary in racing and such, but also for safe and comfortable street driving (it will be road legal, as stated before).
A set of adjustable rear arms was also crafted, in order to further tune toe and correct any bad angles that might be there , courtesy of the heavy mods the car went through

After that, i turned my attention to the handbrake system. The one i 1st designed wast working at all. It wasnt able to lock the wheels with the drums, and the lever was just a big mess. Since we took the care to keep most of the original systems intact , i re-stated the original handbrake cables, original brakes and will use the subaru brakes as a second set of calipers, actuated by a separated lever and reservoir.

This picture shows the subaru caliper sitting on top and the mazda caliper on the lower portion, the mazda caliper holds the parking-brake setup and the footwork, the other one handles only the drift brake.

And this is the picture of the final set-up. I still have to provide the proper brake lines for the drift brake, but its easier to source this so i am letting it go for now, will work on it later. I had brake issues to solve.

I have bled again and again the brake system, with a system that uses a reservoir, a fuel pump and a remote control to move the fluid through the lines. No bubbles ever, but a spongy brake pedal. The vacuum reservoir is working accordingly (i heard lot of stories about people going into bigger brakes and needing a different brake booster), it ended up being the brake master cylinder.
I preffer brand new master cylinders, but the only option i had was to have it serviced (importing it would be way too expensive), it will be on my hands on the monday (13-oct-2014). I will report in when i have it installed, but seeing how bad was its shape, i will probably have everything working i hope.
On a side note, performance oriented, i got myself the ITBs from a yamaha R1, and i will install them on the car as soon as i get its brakes working, along some custom made exhaust manifold, since the car feels held back by the current exhaust size. I hope the ITBs and proper exhaust tuning can take me closer to my power goals.

Thats all for now folks, i am deeply sorry to keep you all in the void like that, at the same time i am glad for ressurecting the thread.
alanfordtw-15
Member
great update. car is a serious piece of work.
this will be complete with pics and vids of it finally drifting..
this will be complete with pics and vids of it finally drifting..

mbretschneider
Member
UPDATE: 1st semester (MAR-JUN) 2015
Hey guys, wassup?

9 months without posting, the car completed its 2nd year in-build march 31st. Many things changed since then and i will update. In fact, i spent December (2014) , January and February (2015) without working in the car. Then in march i started my Masters Degree Course (Material Science and Industrial Processes) wich also took a toll on my time schedule (but allowed me to talk to many engineers and talk with many engineers, teachers and colleagues that sparked many more ideas into my project). Lets review the original goals and what i have at hand so far, shall we?
The Goal (Stabilished in March 2013):
Convert the car to RWD (its an AWD unibody, the JDM version has AWD as option), reach close to 200 horsepower, hoon the streets at night in my local mountain pass and hit trackdays without being a trailer queen. I will be keeping it road legal, so no big power numbers, full interior trim will stay (though i plan to change the seats in the future), air con is staying too, the summer is scorching.
The Plan (As in March 2013):
I managed to get my hands on some parts of the only miata wreck that is known of in Brazil (the little car is being sold in spares FAST because of the its rarity), getting the essential parts of it and i will be fabricating the rest. The BP and FS engine are much alike on transmission fittings, a flange will do the job. So i I will be using a lot of local brands, since importing here costs 80% of the item price PLUS shipping. Thats for taxes.
The Goal (As in July 2015)
RWD was properly achieved and tested (to 6000RPM , i plan to retain the original 7000RPM cut). A failure in the flywheel center bearing made us end the dyno session in 6000rpm , we clocked around 150hp (125hp is the original standard) on 10.4 CR and 87 octane peewater-gasoline. The Fueltech EMS provided great adjustability and capacity to improve the torqueband. We didn't saved any sheets, the car was running a safer-than-safe map, righ and without much timing dialed in. It was just a session t o test the RWD.
The car has reliable RWD, i swapped the r160 welder for a r180 LSD from a turbo SF5 Forester (street driveability improved a lot, also better axles n such) .
The wilwood brakes were sold. The car is light for its size (1150kg / ~2535lbs) and the balance was too much forward oriented, the front wheels locked easily. Over-engineering at its finest. Cashed in good.

The rear suspension was a big mess. I prototyped over and over and cut and welded the hubs to a point they were a big big mess. I don't see it in a bad way, i think it is part of a process, i never thought i could nail it on the very 1st try (though we nailed pretty much 70% of what we done on 1st tries, working through the measure-twice-cut-once method), because geometry and stuff. I also wasn't liking the way the rear shocks were working, they were banked like 30 degrees or so and the rubber bushings on top were rattling.

This leads to some great news. By the end of 2014 i met a great friend (who was following me both in here and on a brazilian website called Flatout that hosts build threads and such), and he invited me to join INTERSTADUAL a local drift crew of crazy guys running Audi EA827 turbo engines on Chevrolet/Vauxhalls Chevettes (or Opel Kadett C). Check on out those vids.
This is brazilian grassroots drifting scene, the chevette is our cheapass s-chassis/miata/86 equivalent, the EA827 turbo is the "that cheap SR banger". You get the context, these guys keep drifting fun. The guy in the silver Chevette sold me a set of toyota mk2 coilovers he would use in his track car (no, i mean, seriously. Seriously).

Though they had to be massaged to fit the 626, of course.

While the customized coilovers and camber plates were getting ready , i worked with the lathe to build custom rear wheel hubs, so i could use a complete subaru suspension kit, replace the messy rear suspension (i hacked and soldered cast iron way past the point it was still safe or had enough resistance), i could have the adjustability i needed and would be able to retain more components in a more OEM-ish style (also, driftworks doesn't fabricate geomasters front and rear kits for RWD 626s).
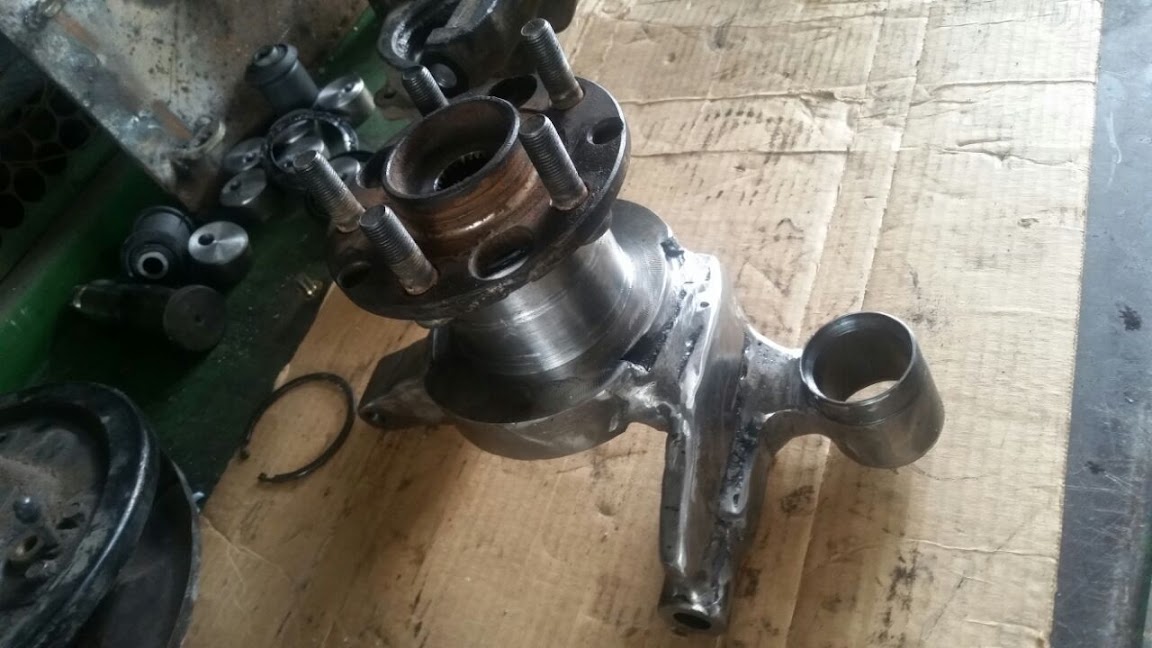
Wanna know a funny thing? the JZX is roughly 300kg heavier than the 626, and the cusco coilovers are far stiffer. I have set them 5cm lower than the originals, just to take a pic and...
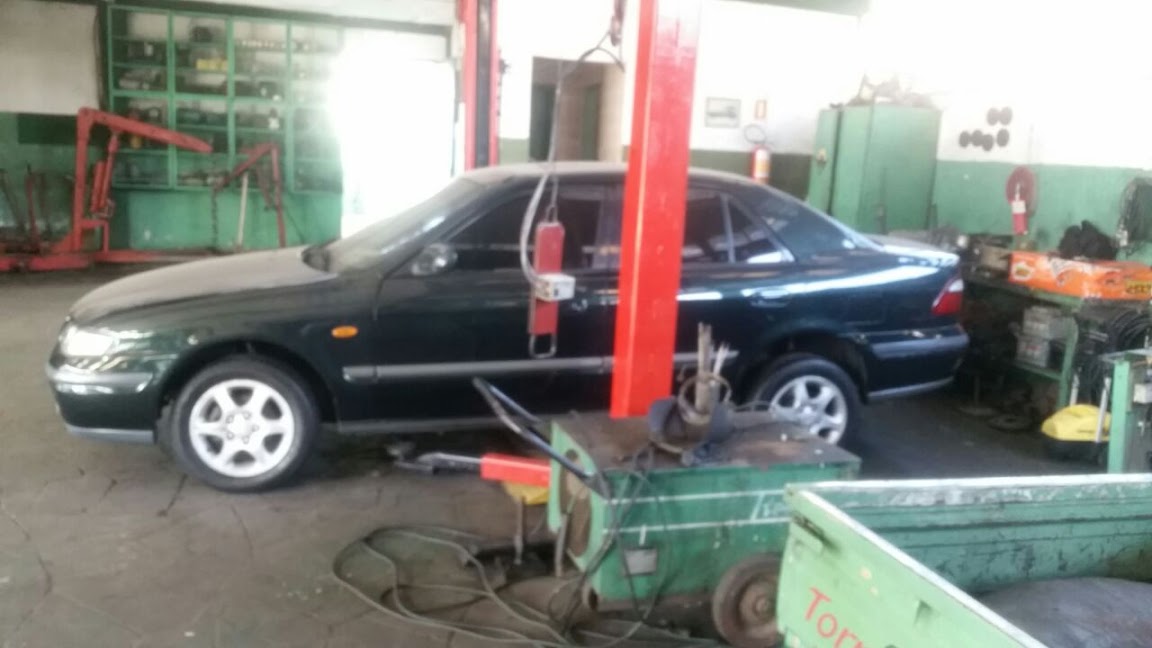
It seems the springs are a little too stiff (way stiffer than the OEMs), not only it didn`t got any lower, it was in fact a bit HIGHER than the original (the coils were set using a jig , considering the overall height of the original shocks) so off they went for another round of massaging. While at it, i decided to remove the engine and check for the flywheel bearing (that one that failed during the dyno pull) and found something weird. When i was working to put the clutch togheter after replacing it, the whole assembly made an ugly "clunk" sound. Uh-oh, problem. Upon disassembly i was reeeeeally disappointed... somewhere, somehow, someone (some service provider) assembled the crank without the thrust bearing. I was very sad and very disappointed with it. I would had to overhaul the engine because of it.
I was seriously shocked and sad when i found this. No clunking noise when driving, nothing weird... nothing, just that damn thrust clearance all wicked upon disassembly. I've put my nerves togheter and decided though, if i have to rebuild it, i have to do it right, i have to do it better. I`ve sourced the basic parts and contacted two big companies , AFP Racing (AFP Racing Components) and Susin-Francescutti (SUSIN FRANCESCUTTI - Virabrequins e Comandos de Válvulas - Susin Francescutti), the 1st one forges custom pistons , the 2nd one, custom con-rods (with matching ARP2000 bolts). A fully forged engine with a turbocharger will (hopefully) be enough to drift properly. Not taking chances this time, i will rebuild the engine myself, in a trustable shop with huge experience on import engines, triple checking all tolerances and specs

So far, this is the status of the project: I am awaiting the pistons to be ready (they`re being manufactured as i post here) , they will be sent to chemical treatments (friction-reduction at the skirts and heat treatments for the top). The CR will be around 11, enough to run proper E100 fuel (we have it 30% cheaper than the peewater 87 octane gasoline) and have decent NA power (i have to recover financially to install the turbo and do all the custom piping needed, so i will run NA until the end of the year, most probably). I just mocked up the turbine inside the engine bay, just to see how it will work in the future.
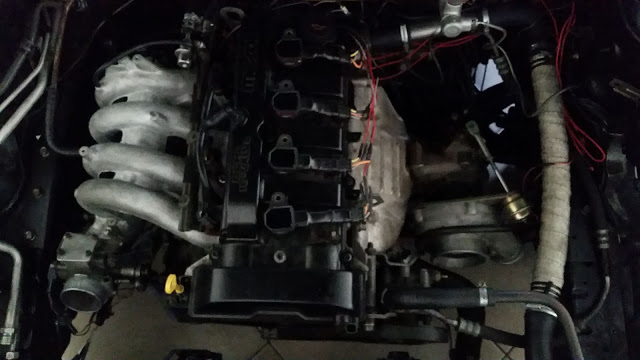
I am hoping i can have the car ready to visit (not as a competitor, perhaps to run the track on the free time avaliable) a drift event in October 12th.
Hey guys, wassup?

9 months without posting, the car completed its 2nd year in-build march 31st. Many things changed since then and i will update. In fact, i spent December (2014) , January and February (2015) without working in the car. Then in march i started my Masters Degree Course (Material Science and Industrial Processes) wich also took a toll on my time schedule (but allowed me to talk to many engineers and talk with many engineers, teachers and colleagues that sparked many more ideas into my project). Lets review the original goals and what i have at hand so far, shall we?
The Goal (Stabilished in March 2013):
Convert the car to RWD (its an AWD unibody, the JDM version has AWD as option), reach close to 200 horsepower, hoon the streets at night in my local mountain pass and hit trackdays without being a trailer queen. I will be keeping it road legal, so no big power numbers, full interior trim will stay (though i plan to change the seats in the future), air con is staying too, the summer is scorching.
The Plan (As in March 2013):
I managed to get my hands on some parts of the only miata wreck that is known of in Brazil (the little car is being sold in spares FAST because of the its rarity), getting the essential parts of it and i will be fabricating the rest. The BP and FS engine are much alike on transmission fittings, a flange will do the job. So i I will be using a lot of local brands, since importing here costs 80% of the item price PLUS shipping. Thats for taxes.
The Goal (As in July 2015)
RWD was properly achieved and tested (to 6000RPM , i plan to retain the original 7000RPM cut). A failure in the flywheel center bearing made us end the dyno session in 6000rpm , we clocked around 150hp (125hp is the original standard) on 10.4 CR and 87 octane peewater-gasoline. The Fueltech EMS provided great adjustability and capacity to improve the torqueband. We didn't saved any sheets, the car was running a safer-than-safe map, righ and without much timing dialed in. It was just a session t o test the RWD.
The car has reliable RWD, i swapped the r160 welder for a r180 LSD from a turbo SF5 Forester (street driveability improved a lot, also better axles n such) .
The wilwood brakes were sold. The car is light for its size (1150kg / ~2535lbs) and the balance was too much forward oriented, the front wheels locked easily. Over-engineering at its finest. Cashed in good.

The rear suspension was a big mess. I prototyped over and over and cut and welded the hubs to a point they were a big big mess. I don't see it in a bad way, i think it is part of a process, i never thought i could nail it on the very 1st try (though we nailed pretty much 70% of what we done on 1st tries, working through the measure-twice-cut-once method), because geometry and stuff. I also wasn't liking the way the rear shocks were working, they were banked like 30 degrees or so and the rubber bushings on top were rattling.

This leads to some great news. By the end of 2014 i met a great friend (who was following me both in here and on a brazilian website called Flatout that hosts build threads and such), and he invited me to join INTERSTADUAL a local drift crew of crazy guys running Audi EA827 turbo engines on Chevrolet/Vauxhalls Chevettes (or Opel Kadett C). Check on out those vids.
This is brazilian grassroots drifting scene, the chevette is our cheapass s-chassis/miata/86 equivalent, the EA827 turbo is the "that cheap SR banger". You get the context, these guys keep drifting fun. The guy in the silver Chevette sold me a set of toyota mk2 coilovers he would use in his track car (no, i mean, seriously. Seriously).

Though they had to be massaged to fit the 626, of course.

While the customized coilovers and camber plates were getting ready , i worked with the lathe to build custom rear wheel hubs, so i could use a complete subaru suspension kit, replace the messy rear suspension (i hacked and soldered cast iron way past the point it was still safe or had enough resistance), i could have the adjustability i needed and would be able to retain more components in a more OEM-ish style (also, driftworks doesn't fabricate geomasters front and rear kits for RWD 626s).

Wanna know a funny thing? the JZX is roughly 300kg heavier than the 626, and the cusco coilovers are far stiffer. I have set them 5cm lower than the originals, just to take a pic and...

It seems the springs are a little too stiff (way stiffer than the OEMs), not only it didn`t got any lower, it was in fact a bit HIGHER than the original (the coils were set using a jig , considering the overall height of the original shocks) so off they went for another round of massaging. While at it, i decided to remove the engine and check for the flywheel bearing (that one that failed during the dyno pull) and found something weird. When i was working to put the clutch togheter after replacing it, the whole assembly made an ugly "clunk" sound. Uh-oh, problem. Upon disassembly i was reeeeeally disappointed... somewhere, somehow, someone (some service provider) assembled the crank without the thrust bearing. I was very sad and very disappointed with it. I would had to overhaul the engine because of it.
I was seriously shocked and sad when i found this. No clunking noise when driving, nothing weird... nothing, just that damn thrust clearance all wicked upon disassembly. I've put my nerves togheter and decided though, if i have to rebuild it, i have to do it right, i have to do it better. I`ve sourced the basic parts and contacted two big companies , AFP Racing (AFP Racing Components) and Susin-Francescutti (SUSIN FRANCESCUTTI - Virabrequins e Comandos de Válvulas - Susin Francescutti), the 1st one forges custom pistons , the 2nd one, custom con-rods (with matching ARP2000 bolts). A fully forged engine with a turbocharger will (hopefully) be enough to drift properly. Not taking chances this time, i will rebuild the engine myself, in a trustable shop with huge experience on import engines, triple checking all tolerances and specs

So far, this is the status of the project: I am awaiting the pistons to be ready (they`re being manufactured as i post here) , they will be sent to chemical treatments (friction-reduction at the skirts and heat treatments for the top). The CR will be around 11, enough to run proper E100 fuel (we have it 30% cheaper than the peewater 87 octane gasoline) and have decent NA power (i have to recover financially to install the turbo and do all the custom piping needed, so i will run NA until the end of the year, most probably). I just mocked up the turbine inside the engine bay, just to see how it will work in the future.

I am hoping i can have the car ready to visit (not as a competitor, perhaps to run the track on the free time avaliable) a drift event in October 12th.
mbretschneider
Member
What happened with this project???
Hope i can clarify what happened so far. Thanks for the interest!
mbretschneider
Member
Update: Forged Pistons Ready!
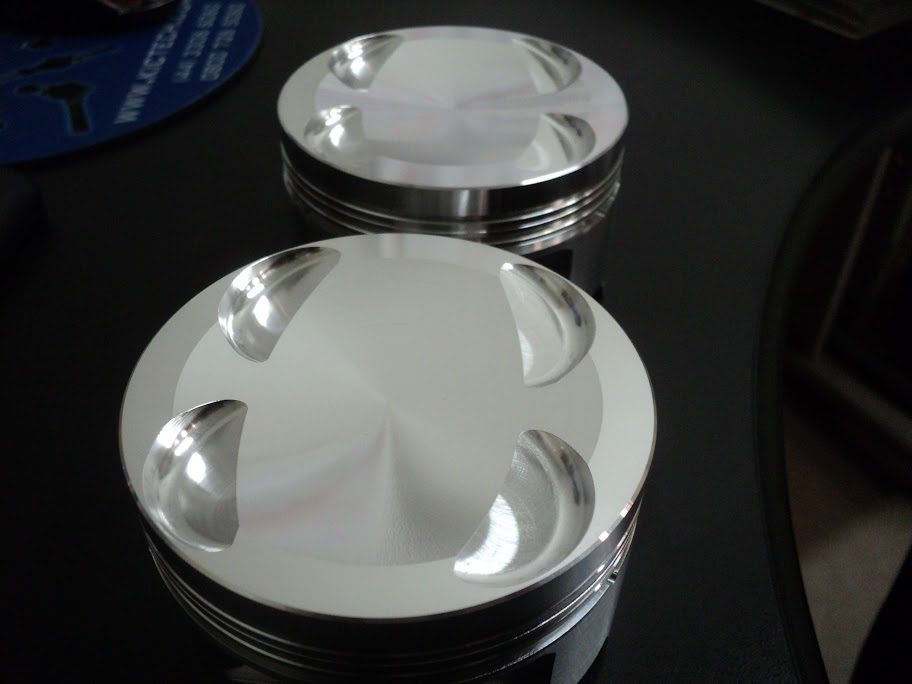
So guys, this is just a picture of the recently machined pistons (out of a forged billet), aren`t they pretty?
They`re being sent to specialized heat/friction treatment now!
So guys, this is just a picture of the recently machined pistons (out of a forged billet), aren`t they pretty?


They`re being sent to specialized heat/friction treatment now!
Robin626-T
New Member
Hello everyone!, what happened with this pro? 

mbretschneider
Member
Quick Reply: A LOT.
Update in the next 24 hours, thank you for subscribing
Update in the next 24 hours, thank you for subscribing
Robin626-T
New Member
Quick Reply: A LOT.
Update in the next 24 hours, thank you for subscribing
OMG!!! thanks Max!

mbretschneider
Member
DEC 2014 update
Past Episode: The pistons went out to be heat treatment coated, so the engine overhaul could begin. The plan is to run it on "E100" (widely avaliable in brazil, 96% ethanol with 4% water content) on forged internals and try to extract the most NA power possible (always the goal).
So far: With the forged pistons in the coating factory, i disassembled the engine , to find what more damage the thrust bearing failure made

The 3rd cylinder bore was scuffed and ovalized towards its longitudinal axis, so the bore was a little over on one axis, and in the other it was like 3 times (because of the crank walk). Forged pistons require more clearance, BUT, in the end the clearance had to be 0.03mm (0.0011in) over what i wanted to have the same bore on all cylinders and not sleeve them (by sleeving i could run the clearance i wanted , but i will let it for when really needed).

While the machine shop was working on it, the engine accessories got a nice cleanup in my garage. A good mix of diesel and gasoline (50-50) cleaned all the aluminium parts easily. Everything cleaned up, time for the rebuild!

With the torque sheet from the service manual and the proper tools, i started the reassembly, nothing fancy here, just beautiful brand new parts.

The treated piston and forged rod combo, ready to get inside the engine...

The bearings got a good triple coat of molybidenium bissulfide (molykote), to reduce the friction (at least on the 1st start, i dont know exactly how much it lasts inside the engine after use) and spin properly on the 1st "dry" start.
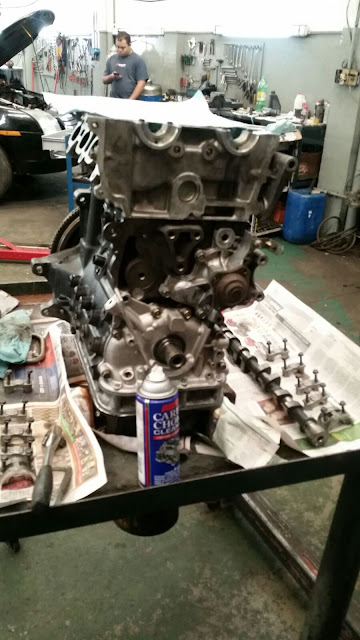
Then i've built up everything, everything spun freely and was tightened to spec. ARP 2000 rod bolts where installed in the con-rods , for better tightening. They came with the bearings, a nice topping from the manufacturer. The con rods were torqued over twice the needed torque for the stock engine, but according to specs from SF Performance.
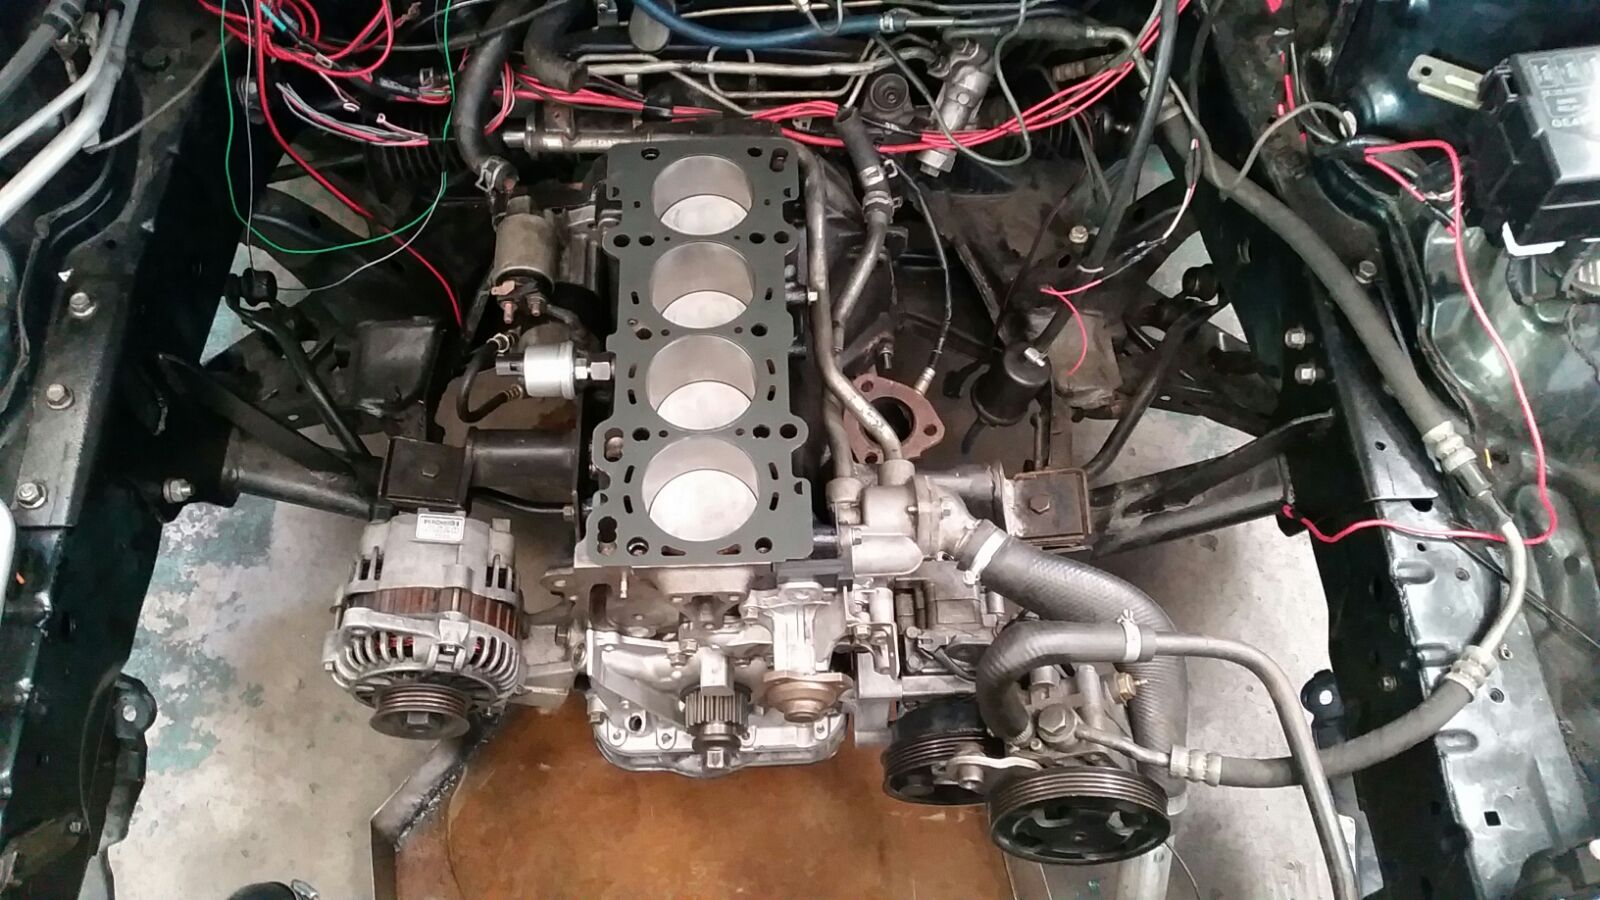
After all the torqueing, sealing and so on, i stopped the work with the head gasket in place wait for the engine head to be torqued. It ended up consuming almost 20 days to get a set of engine head bolts (mine were stretched from previous torqueing), that sat me back for a long time.
I beg you all pardon, begin taking a masters degree in materials engineering and dealing with close family members health problems, my time to work in the car diminished and my routine kept me away from this wonderful community. I am to report back in a couple days with the 1st ethanol start and the rest of the story, stay tuned and thanks for all the support.
Past Episode: The pistons went out to be heat treatment coated, so the engine overhaul could begin. The plan is to run it on "E100" (widely avaliable in brazil, 96% ethanol with 4% water content) on forged internals and try to extract the most NA power possible (always the goal).
So far: With the forged pistons in the coating factory, i disassembled the engine , to find what more damage the thrust bearing failure made

The 3rd cylinder bore was scuffed and ovalized towards its longitudinal axis, so the bore was a little over on one axis, and in the other it was like 3 times (because of the crank walk). Forged pistons require more clearance, BUT, in the end the clearance had to be 0.03mm (0.0011in) over what i wanted to have the same bore on all cylinders and not sleeve them (by sleeving i could run the clearance i wanted , but i will let it for when really needed).

While the machine shop was working on it, the engine accessories got a nice cleanup in my garage. A good mix of diesel and gasoline (50-50) cleaned all the aluminium parts easily. Everything cleaned up, time for the rebuild!

With the torque sheet from the service manual and the proper tools, i started the reassembly, nothing fancy here, just beautiful brand new parts.

The treated piston and forged rod combo, ready to get inside the engine...

The bearings got a good triple coat of molybidenium bissulfide (molykote), to reduce the friction (at least on the 1st start, i dont know exactly how much it lasts inside the engine after use) and spin properly on the 1st "dry" start.

Then i've built up everything, everything spun freely and was tightened to spec. ARP 2000 rod bolts where installed in the con-rods , for better tightening. They came with the bearings, a nice topping from the manufacturer. The con rods were torqued over twice the needed torque for the stock engine, but according to specs from SF Performance.

After all the torqueing, sealing and so on, i stopped the work with the head gasket in place wait for the engine head to be torqued. It ended up consuming almost 20 days to get a set of engine head bolts (mine were stretched from previous torqueing), that sat me back for a long time.
I beg you all pardon, begin taking a masters degree in materials engineering and dealing with close family members health problems, my time to work in the car diminished and my routine kept me away from this wonderful community. I am to report back in a couple days with the 1st ethanol start and the rest of the story, stay tuned and thanks for all the support.
Lambo_Rambo
New Member
Admiration for your skills and dedication, but... its so not worth it... For the money you put into it you could buy a very nice RWD car, and for the time you put into it you could be killing tires...
alanfordtw-15
Member
Admiration for your skills and dedication, but... its so not worth it... For the money you put into it you could buy a very nice RWD car, and for the time you put into it you could be killing tires...
He has explained the reasons and context of this build multiple times in the thread, what he is doing is exactly the best course for his requirements. read it from the start
Great update, I am enjoying following the build and looking forward to seeing the end result.
well done

Robin626-T
New Member
thks for the update, I agree with Alan, I can't wait for teh end result.  FORZA!!!!
 FORZA!!!!
lucasobrinho
New Member
nunca imaginei encontrar um Brasileiro aqui, que projeto insano! parabens pela dedicação e força de vontade, tenho vontade de montar um tambem mas só de imaginar a dor de cabeça que é montar qualquer carro aqui ja me desanima, parabens mesmo! e tu tem que mandar o projeto la pro site Flatout po, galera la ia ficar louca