Project Manual Lexus GS300 skidder

Sorry for the massive lack of updates, had to leave the country to go to uni and never got round to writing the last post. I have my flight booked back for the 18th of December, so there should be three weeks of hectic updates. There is a small update from before I left,

Painted the valve covers
2015-08-29 20.29.35.jpg
2015-08-29 21.14.37.jpg
2015-08-29 21.14.28.jpg

2015-08-30 21.13.51.jpg


They turned out really well and I love the colour, going to use it in a few bits round the car. This is the actual colour of the brake calipers too, the photo I put up a while ago came out a weird colour.

Put the valve covers back in, inlet manifold and throttle body were a pain to not scratch the fresh paint.
2015-08-31 16.52.10.jpg


Cut a few holes in the bumper
2015-08-23 16.15.47.jpg


The aim is to get more air coming through the front bumper as I plan to run an oil cooler and power steering fluid cooler. Apparently these cars have a habbit of blowing power steering pumps when being pushed hard. The girlfriend is getting me a welder for christmas, so I plan to modify the front bumper bar to get air going to the right places.

Threw the bumper back on, and I like it. I seem to have a habbit of cutting holes in front bumpers, but I like square side mounted number plates, so it suits me nicely.
2015-08-23 17.27.55-1.jpg

2015-08-31 16.52.23-1.jpg


Got to start it for the first time in a while and it was a sweet moment with no exhaust. Have a short video somewhere, will try and find it.

Got a new handbrake shoe fitting kit and refitted that and the disks and calipers. First time refitting shoes, was a bit fiddley.
2015-09-01 20.01.48.jpg
2015-09-01 20.07.58.jpg


Whilst the car was started, I put it in drive and got the wheels turning to make sure everything was okay, there was a bad grinding sound from both rear hubs. I knew I had two wearing abs rings that I hadnt really been worryng about because they are coming out when fun things happen over christmas. Well turns out they are wearing because part of the dust shield for the wheel bearing has bent towards the abs ring and the ring was chewing it. Took a dremel to the dust cover, but it didnt help much so I plan to just press two new dust shields into the hub when I get home and remove the abs rings.

You can see where the sensor hole in the dust shield has allowed it to bend out.
2015-09-02 13.53.33.jpg


So thats the thread up to date now. Cant wait to get back and get the ball rolling on the big stuff. Going to write a post later going through my plans as I need a bit of advise, so to the fellow aristo/gs swappers on here, please watch out for that.

2015-09-01 20.01.43.jpg
 
Last edited:
Right, so as I said, getting back from uni on the 18th, and I've got a bit of money together for some nice parts, and insurance company is promising me I'll get the check for the CLK crash any day now.... Over christmas I'm hoping to get most of the groundwork for the conversion and some of the modifications being done before the car goes back on the road. If the insurance company finally pays up I might even get it done.

So I thought Id go over the plans and hopefully a few of you can weigh in with a few questions I have.

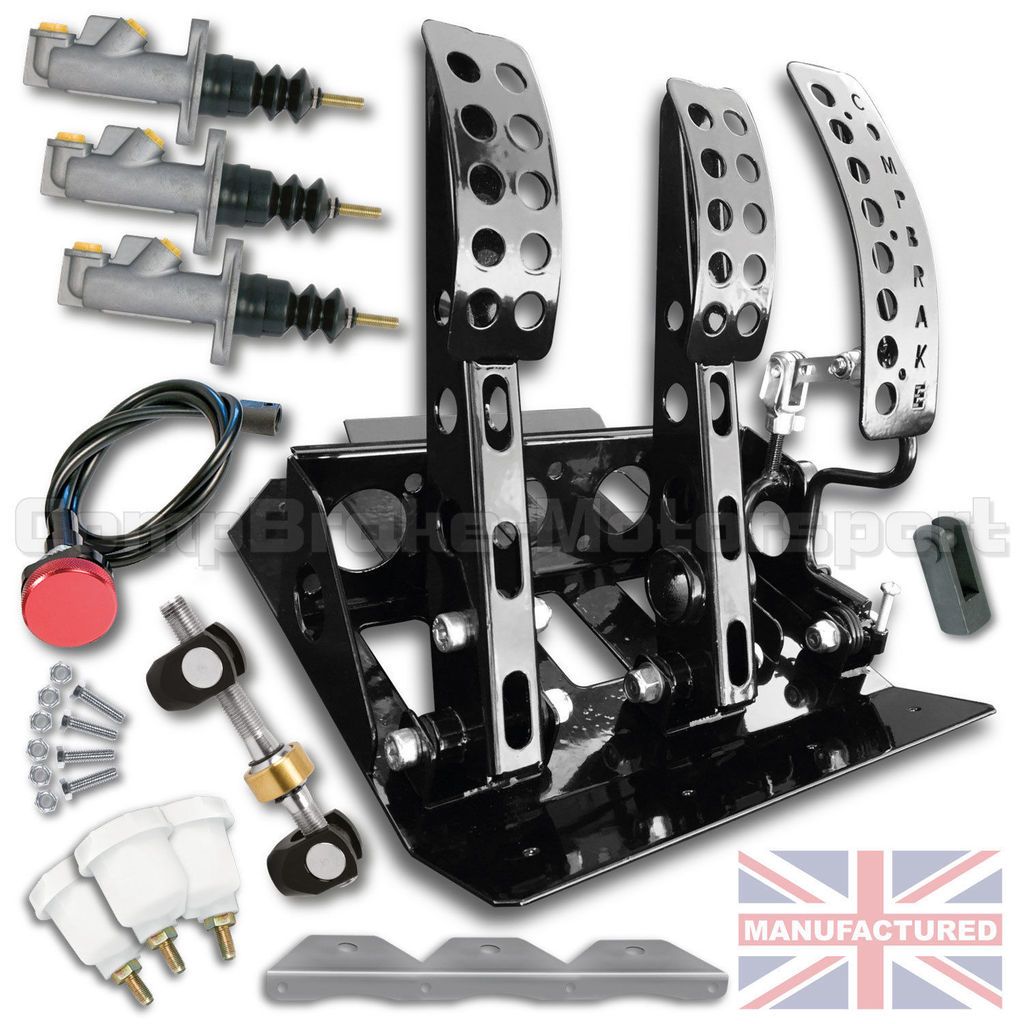
Firstly, the whole brake system is being ripped out and the two pedals. I plan to have a clean stripped interior, and instead of getting a clutch pedal to fit I have always wanted a racing pedal box. Love heel toeing and all that fun stuff and dont like ABS in general. When the brake system is out, I am going to fit a floor mounted pedal box with dual MC's for the brakes and a bias bar. Then simply run a brake line forward to a T piece and the other to the back with an in line hydro.

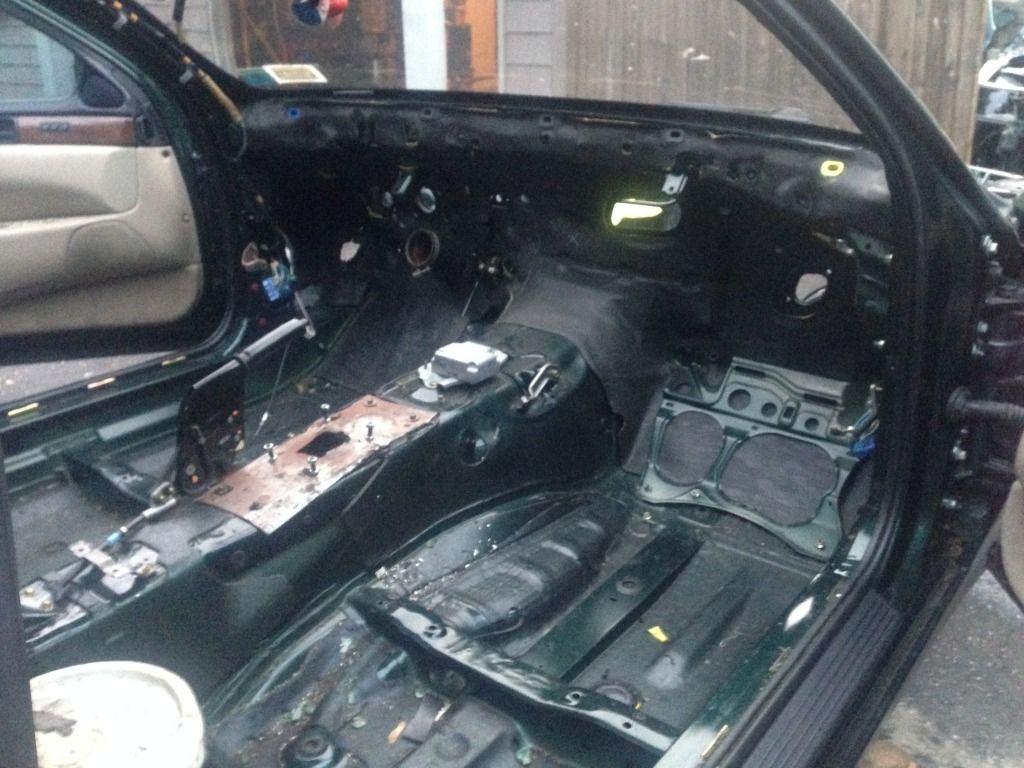
The reason I have chosen floor mounted is because I dont want to have to pull the dash as I've never done it and have no idea how much of a pain it would be. I also like the style of the floor mounted ones more, with a proper footplate below them they look nicer and look nicer to use. Also seeing as I will soon posses a welder I figure it wont be hard to get the floor flat with some sheet steel and a bender. This leads me to question one, when researching I could only find clear photos of the Lexus SC floor with the carpet out. Does anyone have a photo of the drivers side footwell of the mkii GS with the carpet up? Particularly where it meets the firewall, and if anyone has a stripped one lying about, could anyone possibly measure the angle where the chassis rail on the footwell floor goes from horizontal to angled up to the firewall. I would measure myself but I'm in Edinburgh and the car is in Northern Ireland.

This is the picture of the SC I have been going off, LHD.


From what I've seen I could weld plates to the sides of the chassis rail to make a flat surface around it. Then get the pedalbox shown below, mount it as far forward as I can with the MC's sloping up towards the firewall and have the pedals not too far forward from where they are now. Do not want to have to extend the steering column as I have no idea how...


Next question, have anyone have a wiring diagram for a mkii GS? I have searched everywhere and cant find one. As I'm completely removing the ABS, I want to pull all the now unnecessary wires out of the loom. I like to tidy up like that.

And finally does anyone know where to get some aftermarket ARB's for the GS? Hoping to get some parts ordered to come home to to speed the process up, any info appreciated.

Well if you made it this far cheers for reading this fairly boring post, cant wait to get back to it.
 
Update time.
Flew back, ordered pedal box, planned to lift carpet and take some final measurements, but came home to a lot of hours in work and two weather warning storms, really not getting much opportunity to work at the car. Realised if I didn't order them soon I wouldn't have time to fit them, so I thought fuck it, they will be made to fit and bought the e46 pedal box as it looked like the best closest to the shape of the carpet.

Then Finally got time to start stripping.

Pulled seats and realised I would have to pull the seatbelt and B pillar trim with it.
12511198_1095418493822485_177487415_o.jpg


To remove the back seat in these you just give it a good tug. Thanks for the info internet.
12511235_1095418457155822_310509437_o.jpg


Under the centre console stuck to the rear heater vent I found this. Anyone know what it does, the knob interests me.

12516707_1095418417155826_1706290156_o.jpg


12476665_1095418387155829_1311662353_o.jpg

10584165_1095418220489179_1605047809_o.jpg


By this stage it was getting dark, so I don't have photos, but I cut away most of that black insulating stuff. Surprised at how heavy it was, going to cut away as much as I can at some point. Then undid the brake lines to the ABS unit, and the four bolts on the inside of the firewall and the whole servo/ABS system came off in one go. Again, ridiculously heavy, glad to be getting rid of it. Opened up a good bit of space in the engine bay too.

Got another day off work. My girlfriend bought me a hydraulic handbrake to go in the Merc, but I didn't get a chance to fit it, so I went about making a bracket for that. First time using my new welder and first time welding car body, blew two wee holes but covered it up properly.
Done two captive nuts and two captive bolts, just seemed best way to do it.

DSCN1714_zpshhyey1vy.jpg


Parts started arriving too, couple of small things, and MY PEDALBOX. I was excited, never had a pedal box before. Quality is amazing, fair play compbrake, I was pleased.

12516762_1095418143822520_1321272753_o.jpg


Went straight out and pulled off the sound deadening where the pedal box would fit. It was a cold morning, so it came off in massive chunks like this. Win.

DSCN1707.JPG


Still need to take a little petrol to it.

DSCN1709.JPG


Put the pedal box in, result, almost perfect fit, looks like it was designed for the car. Matched the three changes of angle in the firewall perfect.

DSCN1710.JPG


Put the drivers seat in to check the position, and realised it was too far to the right due to one of the bends in the firewall. Planned out some simple brackets and started them. Captive nuts all round as they are the shit.
First one.

DSCN1719.JPG


DSCN1723.JPG

The plate at the back of the bracket just welds to the car and the pedal box bolts to it.


Got the second one started, but it got too rainy to weld. Called it a day. I'll finish it tomorrow after work.

DSCN1726.JPG


Fun things in store.
 
Last edited:
The little black box you found behind centre console please tell me you didn't move it to far from where it was or tilt it to much,or turned the dial.

It's an important sensor,
the dial needs to be set by toyota I turned mine upside down shook it then turned the dial up & down a few times I just dropped it in the vicinity from where it came & put everything back.

It was nothing but a nightmare trying to figure out what was wrong with my car when it started acting/driving awful with numerous codes lighting up on the dash.

Oh and what does it do/what is it for..........
Alarm control module ecu sensor.
Nothing to worry about ignore everything above

Bollocks. I haven't touched the dial, but it has been lying about the transmission tunnel while I was working. Plenty of moving and tilting. I'm going to hope for the best for now and if it dosen't work when it goes back together you might get a PM.
 
Go progress man. Im looking for my first welder, whats the spec of yours

I got a Draper 90A 230V Gasless MIG.

Went with this particular on because I didn't think I would need any more than 90A for automotive work and it has four power settings. Others I looked at only had two power settings, and I had heard this wasn't much good for thin car metal. I get full penetration on 3mm think plate on 3\4 power so the power is enough for anything I'd be doing.

I went gasless as I thought it would be a pain sorting gas bottles and fairly expensive. It welds pretty much the same as a conventional MIG apart from chipping off the slag after each pass, which takes ten seconds and dosen't really bother me.

The welder came with a chipping hammer/wire brush, a reel of flux cored wire, (which must be used for gasless) and a hand held welding mask, although I plan on buying a proper mask as I prefer to have my other hand free to support my torch hand.

Hope this helps.
 
Here we go again.

So after the last update I finished the second bracket, nothing fancy, then got both brackets welded to the car. Pretty hard to get the torch and my head in the weld the back of the brackets, but it went well.

DSCN1737.JPG


DSCN1730.JPG


Love it.


Then I found a spot to mount the bias bar adjuster.

DSCN1738.JPG


DSCN1740.JPG

This wont be to everyones taste, but I love mental looking drift cars, and Carl Thompson's 4 rotor turbo has reservoirs on the dash, and so does mines.

DSCN1749.JPG


Planning on getting braided lines, which I'll neatly cable tie under the brackets, then the three lines will enter a small hole in the dash to the left of the heater controls and run to the pedal box.


Started the battery relocation, still waiting on cable ends to ground the negative. Noticed the battery grounds directly to the engine from the factory. Don't know if I should run a negative cable to the factory location for peace of mind, or just ground it to the chassis as I was planning and get a grounding kit for the engine bay.

DSCN1742.JPG


Drilled holes for the tie down bar, but I need to get a tap and die set to extend the thread on the J-hooks to get it tight enough.

DSCN1746.JPG


Finally, fitted the bias bar to the pedal box and adjusted the clevises to get the pedals sitting at a better angle, and had another test fit. The interior is starting to look pretty racecar. Still got the hydro and a nice kode steering wheel to go in too.

DSCN1747.JPG


DSCN1750.JPG


Next on the list is prime and spray floor/tunnel, and fit a drivers foot plate to get my feet in the right place. Then I need to run some brake lines.
 
Last edited:
Bollocks. I haven't touched the dial, but it has been lying about the transmission tunnel while I was working. Plenty of moving and tilting. I'm going to hope for the best for now and if it dosen't work when it goes back together you might get a PM.
I hope you read the last part of my post.
[emoji12]
 
No actual progress to update as I'm back in Edinburgh for uni, but I have started ordering parts and it will be back on the road over easter break. It had better.

So anyway, assessed the gearbox options, didnt like the price of toyota boxes and the ABC BMW conversion kit was way out of budget. Heard of a company PMC motorsport offering a billet adapter plate and flywheel for a BMW box conversion. Looked into it and it looked like a really nice kit, no countersunk screws, comes with a sleeve for the input shaft. Very reasonable price, and allows a good variety of five and six speed boxes to be used. Ordered a kit.

2016-03-24 22.32.15.jpg


2016-03-24 21.37.12.jpg


Next big purchase was a set of BC BR Extra Low coilovers. Extra low option allows me to get a good drop and maintain adjustability, went for 12kg/mm front springs and 10kg/mm for the rear. Should be nice and stiff, and the dampeners are 30 way adjustable anyway. Should be arriving at home soon.

Ordered a few parts to my flat in Edi. Going to take them home in a suitcase to save shipping costs to northern ireland (the joys of non-mainland uk).


I had planned to try not buy anything else until the car was on the road incase there were any setbacks, but then I saw these for a stupidly low price new and couldn't resist. XXR 551, 18 x 9.75 Et22. Hoping they are wide enough to require some bolt on arches as I love he look. Worked out they will sit 50.1mm further out than standard at each corner thanks to willtheyfit.com. Nothing nicer than a wide car.

(Edit picture from the future, photobucket killed the some original photos)

2016-04-14 21.19.01.jpg


Ordered a pile more small things to the house, and I should have a gearbox soon after I'm back. Want to get it locally so I can also grab the selector and arms and gearbox mount to chop up. Looking for an E46/E39 330d/530d box preferably, but more likely the cheaper but also strong 5 speed zf box.

Roll on easter!
 
Last edited:
Back
Top